How to Install a Fireplace Surround?
On this page (8 sections)
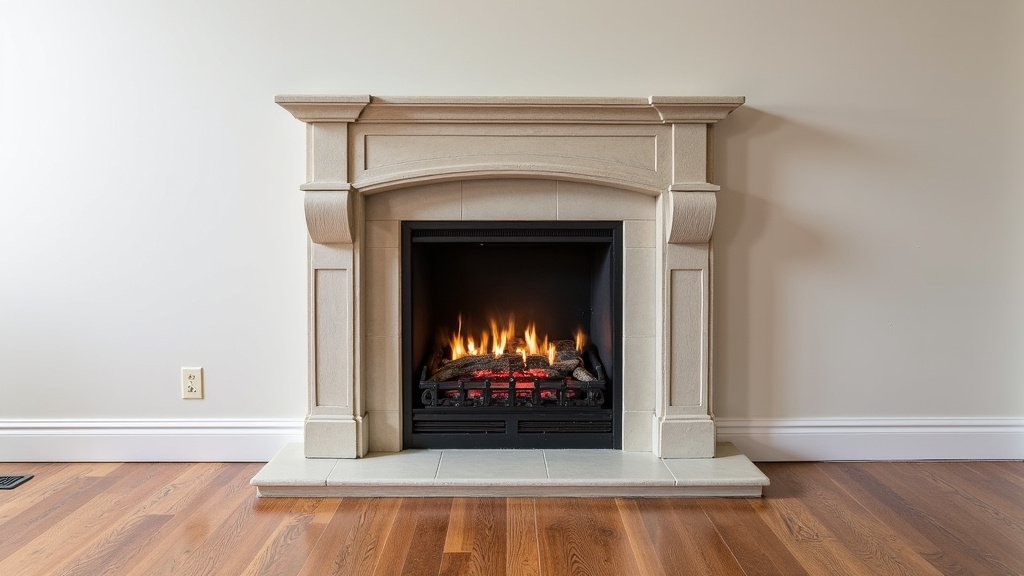
Installing a fireplace surround yourself is a doable DIY project. For the full project, see our guide to building a fireplace surround. With the right tools and a bit of patience, you can transform your fireplace area. You’ll need to measure carefully and secure the materials properly for a safe and attractive finish.
A fireplace surround does more than just look good. It protects your walls from heat and soot. It also provides a beautiful focal point for your room. Many homeowners find it a rewarding way to update their living space without a major renovation. We found that taking your time is key to a professional-looking result.
- Measure your existing fireplace opening and hearth area precisely.
- Choose a surround material that fits your style and is heat-resistant.
- Prepare the area by cleaning and marking guidelines for placement.
- Secure the surround pieces firmly to the wall and hearth.
- Finish with caulk or grout for a clean, polished look.
Let’s walk through exactly how to install a fireplace surround step by step, making sure you get a beautiful and secure finish for your home.
Updating Your Fireplace: Installing a New Surround
Adding a new fireplace surround is a fantastic way to refresh your living space. It’s more than just a decorative element; it’s a protective barrier and a central design feature. We’ve found that a well-chosen and properly installed surround can completely change the feel of a room. Let’s break down the process, so you can tackle this project with confidence.
Choosing Your Fireplace Surround Material
The first step is selecting the right material for your surround. This is where your personal style meets practicality. Think about the overall aesthetic you’re going for. Do you want something sleek and modern, or more traditional and rustic? Many experts recommend considering the heat resistance of your chosen material. You’ll want something that can withstand the warmth of your fireplace without degrading over time.
Popular Surround Material Options
There are several common materials homeowners choose for their fireplace surrounds. Each offers a different look and feel. Understanding these options can help you make the best decision for your home and your DIY capabilities.
Tile Surrounds
Tile is a very popular choice. It comes in a vast array of colors, patterns, and textures. Ceramic, porcelain, and natural stone tiles are all excellent options. They are durable and easy to clean. Many guidelines suggest checking the tile’s PEI rating for durability. Porcelain tiles often have higher ratings, making them ideal for high-traffic areas like living rooms.
Stone or Brick Surrounds
For a more robust and classic look, consider natural stone or brick. Materials like granite, marble, or even manufactured stone veneers can create a stunning focal point. Real stone can be heavy, so you might need extra support. Brick offers a timeless appeal that works well in many home styles. We found that many homeowners appreciate the natural beauty and longevity of these materials.
Wood Mantels and Surrounds
Wood can add warmth and character. However, it’s crucial to use heat-resistant wood or materials that mimic wood for areas close to the firebox. Many building codes require a certain distance between combustible materials and the opening. Always check your local building regulations. You might opt for a wood mantelpiece above a non-combustible tile or stone surround.
Metal Accents
Some modern designs incorporate metal. Think stainless steel, copper, or wrought iron. These can be used as an entire surround or as decorative inserts. Metal offers a sleek, contemporary look. They are generally very durable and heat-resistant. Just be sure the metal is finished to prevent rust or damage from soot.
Gathering Your Tools and Materials
Once you’ve picked your surround material, it’s time to get everything you need. Having all your tools ready will make the installation process much smoother. Think of it like preparing your ingredients before you start cooking – it prevents frustrating pauses.
Essential Tools for Installation
Your tool list will depend on your chosen material, but some items are almost always necessary. We found that having these on hand makes a big difference:
- Tape measure
- Level (a long one is best)
- Pencil or chalk line
- Utility knife
- Safety glasses and gloves
- Caulking gun (if using caulk)
- Screwdriver or drill with appropriate bits
- Stud finder
Specific Material Tools
Depending on your material, you might need more specialized tools. For example, if you’re working with tile, you’ll need a tile wet saw or nippers, tile adhesive, and grout. For stone, you might need a specialized adhesive or mortar. If you’re working with wood, you’ll need woodworking tools like a saw and sander. Research the specific needs for your material. Many manufacturers provide detailed installation guides.
Your Surround Material
Make sure you have all the pieces for your surround. This includes the main surround panels or tiles. You’ll also need any edging pieces, trim, or decorative elements. It’s always wise to order a little extra material – maybe 10% more. This accounts for any mistakes or cuts that don’t turn out perfectly. We found that having a bit of extra tile or stone is a real lifesaver.
Preparing Your Fireplace Area
Before you can install your new surround, the area needs to be prepped. This step is vital for a professional and long-lasting finish. A clean, smooth surface makes a huge difference. Many professionals stress the importance of this stage.
Cleaning the Existing Surface
Start by thoroughly cleaning the area where the surround will go. Remove any old caulk, paint, or debris. Dust and grime can prevent adhesives from sticking properly. For a smooth finish, you want a clean canvas. Wipe down the walls and hearth with a damp cloth. Let it dry completely before proceeding.
Measuring and Marking Guidelines
Precise measurements are key. Measure your fireplace opening and the area where the surround will be placed. Use your tape measure and a level to mark the exact placement. A chalk line can help create straight, clear guidelines on the wall and hearth. Double-check your measurements. We found that measuring twice and cutting once is truly excellent advice here.
Ensuring a Level Surface
Your surround will only look as good as the surface it’s attached to. Use your level to ensure the wall and hearth are as flat as possible. If there are any significant bumps or dips, you might need to skim coat the area with joint compound to level it out. This is especially important for tile surrounds. A level surface prevents gaps and ensures a seamless look.
Installing Your Fireplace Surround
Now for the exciting part – putting your new surround in place! This is where your preparation pays off. Take your time and follow the steps carefully. If you’re working with a partner, it can make handling larger pieces much easier.
Applying Adhesive or Mortar
This is where your chosen material dictates the method. If you’re using tile, you’ll apply tile adhesive (thin-set mortar) to the wall or the back of the tile. If you’re using stone panels, you might use a specialized adhesive or mortar. Follow the manufacturer’s instructions precisely. Many adhesives have a specific working time. Don’t mix more than you can use within that window. We found that using the correct trowel size is essential for getting the right amount of adhesive down.
Placing and Securing the Pieces
Begin placing your surround pieces according to your marked guidelines. Start from a central point and work your way outwards. For tiles, press each one firmly into the adhesive. For larger panels, you might need to slide them into place. Use your level frequently to ensure everything is straight. If you’re using spacers for tile, insert them as you go. Many experts recommend using painter’s tape to hold pieces in place while the adhesive sets, especially on vertical surfaces.
Cutting Pieces to Fit
You will likely need to cut some pieces to fit around the fireplace opening or at the edges. This is where your specialized tools come into play. Measure carefully for each cut. Safety first: always wear safety glasses when cutting materials. If you’re unsure about making cuts, consider having a local tile shop or hardware store make them for you. They often have the right equipment.
Allowing for Proper Curing Time
Once all the pieces are in place, you need to let the adhesive or mortar cure. This can take 24 to 72 hours, depending on the product and humidity. Resist the temptation to touch or disturb the surround during this time. This curing period is vital for ensuring the surround is securely attached. Many manufacturers will specify the cure time before grout or final sealing.
Finishing Touches for a Professional Look
The final steps are what truly complete the installation. These small details make a big difference in the overall appearance. They also help protect your surround and your walls.
Grouting (if applicable)
If you installed tile, the next step is grouting. Mix the grout according to the package directions. Apply it evenly, pressing it into the spaces between the tiles. Wipe away excess grout with a damp sponge. You’ll likely need to do a final buffing once the grout has slightly dried to remove any haze. Many grout manufacturers offer sealants to protect the grout from stains.
Caulking Gaps and Edges
Use a high-quality, heat-resistant caulk to fill any small gaps around the edges of the surround or where it meets the fireplace opening. This provides a clean, finished look and seals out dust and drafts. Choose a caulk color that matches your surround or the adjacent wall for a cohesive appearance. A smooth bead of caulk makes a big difference. We found that a caulk tool can help you achieve a perfectly smooth line.
Cleaning and Sealing
After the caulk and grout have fully cured, give your new surround a final cleaning. If your material requires sealing (like natural stone or unglazed tile), apply the sealant according to the product instructions. Sealing protects against stains and moisture. This final clean and seal step is like the cherry on top of your DIY project. You’ve worked hard, and it’s time to admire your beautiful new fireplace!
Final Checklist for Success
Here’s a quick rundown to ensure you haven’t missed anything:
- Double-check all measurements before cutting.
- Use a level on every piece installed.
- Ensure adhesive/mortar is applied evenly.
- Allow adequate curing time before grouting/caulking.
- Clean up excess adhesive, grout, or caulk promptly.
- Apply any necessary sealants as recommended.
Conclusion
You’ve now seen how installing a fireplace surround can transform your living space. We’ve covered everything from picking the perfect material to the final touches that give your project a professional polish. Remember, patience and attention to detail are your best tools here. Taking your time with measurements and preparation will lead to a beautiful, safe, and lasting result you can be proud of. Your next step is to gather your chosen materials and tools and schedule a weekend to bring your fireplace vision to life!
Frequently Asked Questions
How much extra material should I buy for a fireplace surround?
It’s wise to purchase about 10% extra material for your fireplace surround. This accounts for potential mistakes during cutting or any pieces that don’t turn out perfectly. We’ve found that having a little extra tile or stone can be a real lifesaver during the installation process.
Can I install a wood surround directly around my fireplace opening?
Generally, it’s not recommended to install combustible wood materials directly next to the firebox. Check your local building codes, as they often require a specific clearance distance from the opening to any flammable materials. You might opt for a heat-resistant material like tile or stone closer to the fire, with a wood mantel above.
What is the best way to ensure my tile surround is level?
Using a long level frequently as you place each tile is key. If your wall or hearth surface has imperfections, you might need to skim coat it with joint compound to create a flatter base. A level surface is essential to prevent gaps and ensure your tiles lie flat for a professional finish.
How do I clean my new fireplace surround after installation?
Once all adhesives, grout, and caulk have fully cured, give your surround a good cleaning. Use a damp cloth to wipe away any dust or residue. If your material, like natural stone, requires sealing, apply the sealant according to the product instructions for protection against stains.
What kind of caulk should I use for fireplace surround edges?
You should use a high-quality, heat-resistant caulk specifically designed for fireplaces or high-temperature applications. This ensures the caulk won’t degrade from the fireplace’s warmth. Choose a color that complements your surround for a clean, finished look that seals out dust and drafts.