How to Install a Chimney Cap?
On this page (5 sections)
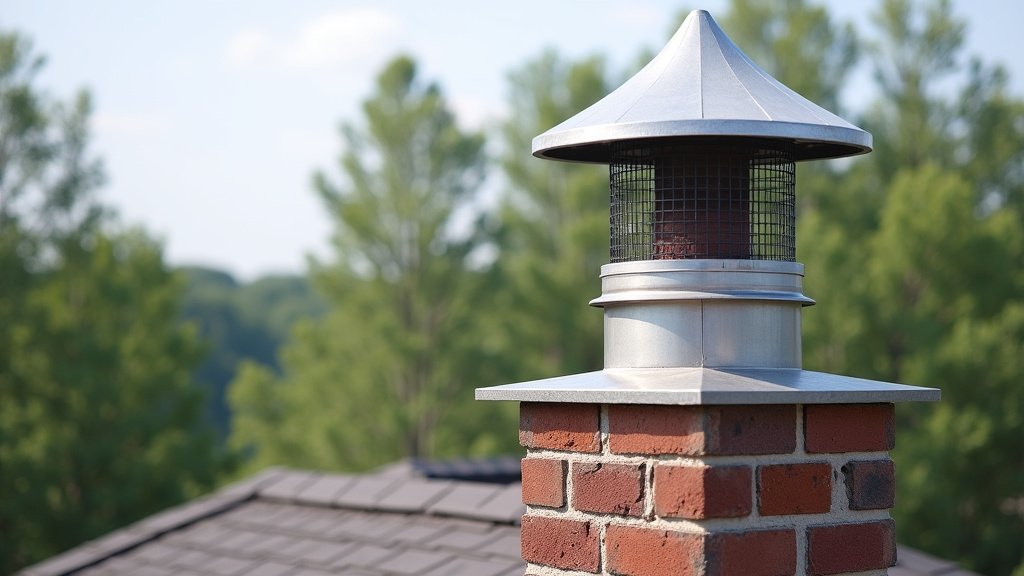
Installing a chimney cap is a straightforward DIY project that can be done in under an hour with basic tools. You’ll want to start by identifying the type of chimney cap you have, as installation methods vary. Most caps either screw directly into the flue tile or attach via a clamp system. Ensuring your chimney cap is securely fastened is key to protecting your home from rain, animals, and debris.
A well-installed chimney cap is essential for chimney maintenance and home safety. It acts as a barrier against unwanted guests, like birds and squirrels, and prevents water damage that can lead to costly repairs. Many homeowners find that a proper installation also helps improve draft efficiency. A chimney fan for draft issues is another option to consider. Research suggests that this simple addition can significantly extend the life of your chimney structure by preventing internal moisture damage and corrosion.
- Identify your chimney cap type.
- Gather necessary tools like a ladder and screwdriver.
- Measure your flue or chimney crown accurately.
- Secure the cap firmly to prevent dislodgement.
- Ensure it’s weather-resistant and durable.
Ready to protect your chimney? Let’s walk through exactly how to get that cap installed, step by step.
Getting Your Chimney Cap Installed Properly
Installing a chimney cap is a smart DIY project. It protects your home from damage. It can also save you money on repairs. This guide will walk you through the process. You’ll learn how to install your new cap with confidence. We’ll cover the different types and the tools you’ll need.
Understanding Your Chimney Cap Options
Before you buy, it’s good to know the types of chimney caps available. If you are fitting a chimney pot, see our guide to chimney pot installation. They offer different levels of protection. Knowing your chimney type will help you choose the right cap. It also guides the installation method.
The Most Common Chimney Cap Types
You’ll likely encounter a few main types. Each has its own way of attaching.
Direct-Fit Caps
These caps are designed to fit directly onto your flue tile. They are very common. Many have expandable rubber gaskets or metal clips. These help create a snug fit. They are easy to install. They require minimal tools.
Clamp-On Caps
Clamp-on chimney caps attach to the outside of the flue. They use metal bands that tighten around the flue. This is a great option if your flue tile is damaged. It’s also good if you can’t get a tight seal with a direct-fit. These caps are very secure once tightened.
Mesh or Wire Cages
These are less common for standard chimney caps. They are more often seen in specialized applications. Think of them as a larger cage around the entire chimney opening. They offer maximum protection against larger animals. Installation can be more involved.
Materials Matter for Durability
The material of your chimney cap is important. It affects how long it will last. It also impacts its resistance to the elements.
Galvanized Steel
This is a common and affordable option. It’s coated with zinc to prevent rust. However, in coastal areas with salt spray, it may not last as long. The zinc coating can eventually wear away.
Copper
Copper is beautiful and very durable. It develops a lovely patina over time. It’s naturally resistant to corrosion. Copper caps are a premium choice. They can be more expensive upfront.
Stainless Steel
This is a fantastic all-around choice. Stainless steel is strong and highly resistant to rust and corrosion. It holds up well in all climates. It’s often considered the best balance of durability and cost.
Gathering Your Tools and Materials
Having everything ready makes the job much smoother. Don’t start the installation until you have your tools lined up. This will prevent frustration.
Essential Tools You’ll Need
Most installations require a few basic items. You might already have these in your toolbox.
- Ladder: A sturdy extension ladder is often necessary. Ensure it’s rated for your weight.
- Work Gloves: Chimney tops can be rough. Gloves protect your hands.
- Safety Glasses: Keep dust and debris out of your eyes. Safety first!
- Measuring Tape: Accurate measurements are key to a good fit.
- Screwdriver or Nut Driver: The type depends on your cap’s fasteners.
- Caulking Gun & Exterior Sealant: For some caps, a good seal is vital.
- Wire Brush: To clean the area where the cap will attach.
Your New Chimney Cap
Make sure you have the correct chimney cap size. Check the manufacturer’s instructions. They will tell you exactly what you need.
Step-by-Step Installation Guide
Now for the actual installation. Let’s get this done step-by-step. Remember safety is always the number one priority. Never work on a slippery roof.
Step 1: Safety First – Prepare Your Work Area
Climb your ladder carefully. Make sure it’s stable on the ground. Have a spotter if possible. Check the weather. Never install during rain or high winds. You need a clear, dry day for this.
Step 2: Measure Your Flue or Chimney Crown
Accurate measurements are critical. You need to know the diameter of your flue tile. For clamp-on caps, you measure the outside of the flue. For crown-mounted caps, measure the crown dimensions. A standard flue is usually 8×8 or 8×12 inches. But yours might differ. Measure twice to be sure.
Step 3: Clean the Installation Area
Use your wire brush. Clean the top of the flue tile or the crown. Remove any loose mortar, soot, or debris. A clean surface helps ensure a good, secure fit. It also allows sealant to bond properly.
Step 4: Install a Direct-Fit Chimney Cap
If your cap has screws, you’ll likely screw them directly into the flue tile. Some caps have anchors that go into pre-drilled holes. Others have springs that expand. Follow the manufacturer’s specific instructions. For many direct-fit caps, you’ll simply push them down firmly. Ensure it feels snug and won’t lift off easily.
Step 5: Install a Clamp-On Chimney Cap
Position the cap over the flue. Line up the clamps. Tighten the screws or bolts on the clamps. Do this evenly around the cap. The cap should feel very secure. It shouldn’t wiggle or move. You want a firm grip on the flue.
Step 6: Secure and Seal (If Applicable)
Some caps might benefit from additional sealing. You can use exterior-grade sealant. Apply it around the base where the cap meets the flue or crown. This adds an extra layer of protection. It prevents water from seeping underneath. For screws, make sure they are tight but don’t overtighten. You don’t want to crack the flue tile. For some caps, a good seal is vital, and our guide on how to install an exterior-grade sealant can help.
Step 7: Final Check and Test
Gently try to wiggle the cap. It should not move at all. If it’s loose, tighten the fasteners further. If you used sealant, allow it to cure fully. You can test its effectiveness by observing your chimney during the next rain. You should see no water pooling or entering.
Troubleshooting Common Installation Issues
Sometimes things don’t go exactly as planned. Don’t worry, most problems have simple fixes.
The Cap Doesn’t Fit Properly
Did you measure correctly? If the cap is too small, you might need a larger one. If it’s too large, you may be able to use shims or additional sealant. For clamp-on types, ensure the clamps are positioned correctly on a smooth part of the flue.
Fasteners Won’t Tight
Conclusion
You’ve learned how to protect your chimney by installing a cap. This simple project keeps out rain, animals, and debris. It extends your chimney’s lifespan and prevents costly repairs. Remember to choose the right cap type and gather your tools. Always prioritize safety when working at heights. By following these steps, you’ve successfully completed an important home maintenance task. Your chimney is now better protected against the elements.
Frequently Asked Questions
How often should I check my chimney cap?
It’s a good idea to inspect your chimney cap at least once a year. Look for any signs of rust, damage, or loose fasteners. A quick visual check after major storms is also wise.
Can I install a chimney cap myself?
Yes, most chimney cap installations are straightforward DIY projects. As long as you have a sturdy ladder and follow safety precautions, you can typically do it yourself.
What if my flue tile is cracked?
If your flue tile is cracked, a clamp-on chimney cap is usually your best option. These caps attach to the outside of the flue, bypassing the damaged tile for a secure fit.
Do I need sealant for my chimney cap installation?
Sealant is not always required, but it can add an extra layer of protection. If your cap uses screws or has a slightly uneven surface, sealant can help prevent water from seeping underneath.
What are the signs that I need a new chimney cap?
Look for visible rust, bent metal, or missing parts. If animals or debris are getting into your chimney, or if you notice water damage around the top, it’s likely time for a replacement cap.